
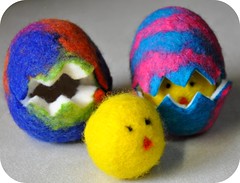
Easter is just a hop, skip and a jump around the corner so today we got down to some serious crafty business and made some felted Easter eggs. I know that many of you probably know how to wet felt already but just in case you don't I thought that I would share how we did it :)
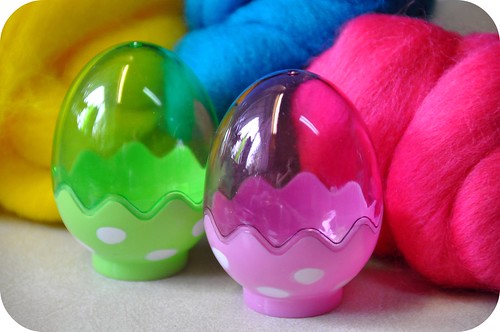
I love wet felting with the kids. It's such an easy activity and what kid doesn't totally love playing in the sudsy soap and water! So out came my stash of wool rovings and a couple of plastic easter eggs that I've been hanging onto for these kinds of projects and a couple of hand towels to soak up any puddles of water that might appear *grin*.
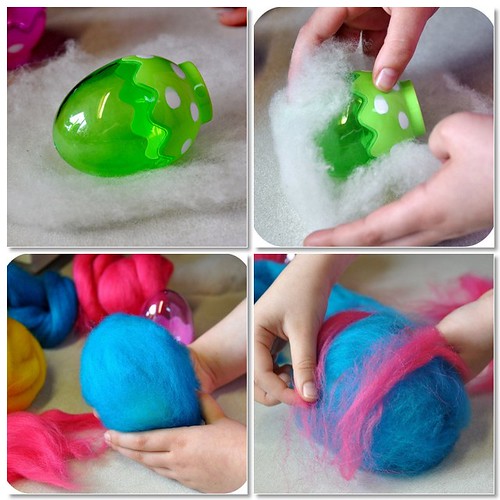
We started by stretching out some plain, undyed wool batting that would become the inner layer of our eggs. I really like to use the plain wool batting as filler for my felting projects because it is SO much cheaper to purchase than the smaller dyed rovings and you can use a lot of it without worrying about using up your stash of the good stuff.
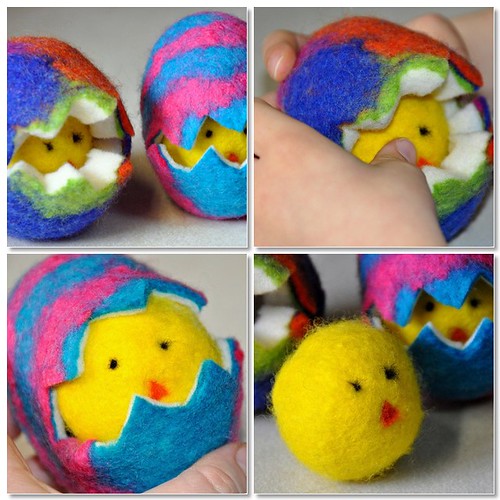
Winding the wool batting around our plastic egg as tightly as we could we continued to add layer after layer, alternating the directions of the pieces with each new one added until it was about three times larger than it's original size and then we added a final layer over the white using some pretty pinks and blues to give our egg color. Make sure you create a good sized ball of wool because it is amazing how much it shrinks during felting :)

Next it was time to get down to the business of felting all that wool together. With the cold water running we dribbled a little of the water at a time over our ball of wool until it was nice and wet. It's important to treat your wool very gently at this point because the wool shifts really easily. So with a generous amount of dish soap on our hands we gently started to pat and rub our egg.
Working our hands around in circles all over the egg we gently agitated the wool until we could feel it starting to become a little more firmer beneath our fingers and then we started to alternate with cold and hot water to shock the wool fibers even more to help them knit together nicely. If you haven't tried this before you will definitely start to feel a difference. The fibers on the surface won't slip around as much, it will start to shrink up smaller and you will be able to rub at it with more pressure the firmer it becomes.
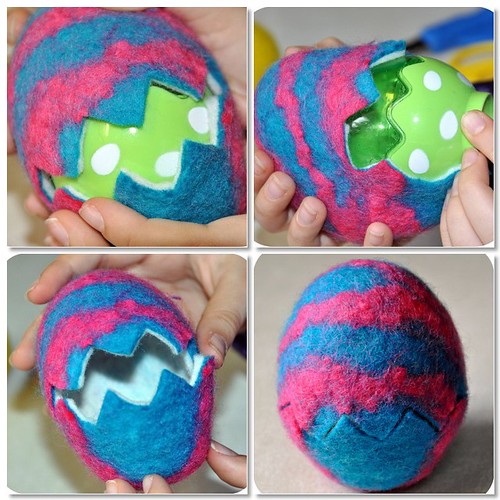
Do not worry if it seems like your wool looks really giant and sloppy over the plastic egg inside! My kids rolled their own eggs this time and I thought they would never shrink down but if you look at the above photos you will see how giant my daughter's egg was when she started and how small it was in the last photos. I did help her out at the end to really rub and squeeze at it firmly and I can't say enough about shocking it with some really hot water and then plunging it back into really cold water again all while rubbing it firmly. It really does help it to tighten up more quickly :)
When we were finished felting our eggs we wet felted a couple of little yellow chicks using the same method as above minus the plastic egg inside and then I tossed both the eggs and chicks into the dryer to shrink them up one last little bit and dry them.
The kids could hardly wait to pull them out of the dryer to see just how I was going to get the plastic eggs out from inside of them *grin*. With a sharp pair of sewing scissors I cut a jagged opening across half of the wool eggs so that they looked like they were hatching open and popped out the plastic eggs from inside of them leaving a perfect hollow center where we could now tuck our little chickies inside...
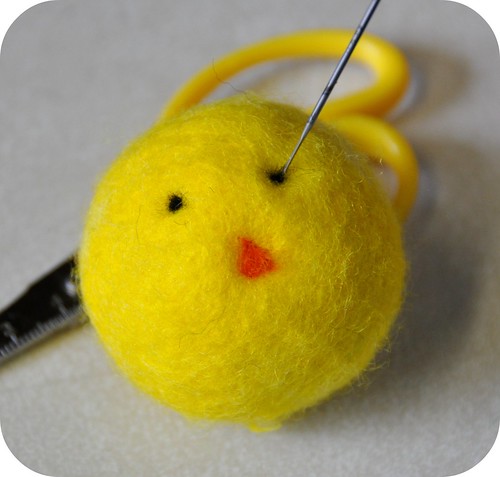
but not before we needle felted on their eyes and beaks :)
All finished and ready for playing with!
There was peeping and cheeping and chickies popping out all over the house all afternoon *grin*.

I hope you have fun making some of your own Easter eggs and chickies :)
Hugs,
Rosina
PS. Looking for more crafty ideas or inspiration? Pop over to Natural Suburbia's Creative Friday and see what others are up to :)


12 comments:
My son just saw these and wants to make them now! So I'm pinning them to hopefully make next week - thanks for sharing!
Those are just too cute! Great job! (:
Adorable! I can almost hear them "peep!"
Those are sooo cute!!
So adoreable! Will have to print this out and file it for next years projects. And thanks for the How-To because I'm one of those who has never tried 'wet felt' projects - but will now! Diane :0) Happy Easter too! http://deedledeedoodles.blogspot.com also called Oodles of Doodles News!
I've linked to this post http://mummyzilla.blogspot.co.nz/2012/04/easter-chicks.html because it is such a cute idea. I also posted about dyeing my own roving for this project - its super easy and really fun.
nice article
کاشت مو
This article is very interesting and may be very useful
فروشگاه اينترنتي
www.baneh.com
goodluck
norton.com setup with product key
mcafee activate product key
Comcast support number
AVG Antivirus phone number
webroot customer service number
Outlook 365 support phone number
webroot antivirus activation code
www trendmicro com bestbuypc
nice atricle
لیزر موهای زائد
رفع موهای زائد
Find solutions here
GlobalEmployees
GlobalEmployees
GlobalEmployees
شركة تنظيف منازل بالدمام
شركة مكافحة حشرات بالدمام
شركة تنظيف موكيت بالدمام
Post a Comment